|
Where To Place The Chord Patterns
Okay, I've promised you this three or four times already, and here it
is.
You now know (or you will, as soon as you have time to practice) all
the patterns and the sequences of the patterns. Now let's look at
where to place the patterns for a chord in any key.
One easy way to find the right fret for a pattern is to place it relative
to a chord that you already know. For example, you already know where
the D7 chord is placed on the fretboard, so you don't really need to memorize
where the Eb7 chord goes: Eb is a half step higher in the scale,
so the chord is one fret higher on the uke. And a C#7 chord would
look like a D7 chord shifted one fret lower on the uke.
| METHOD #1: Use the chords you already know to help place that
same chord pattern elsewhere on the fretboard. |
That's an easy way to place a chord pattern if the two chords
(the one you know, and the one you're trying to figure out) are near each
other, as in the example we just looked at. But when the two chords
are far apart (for example, using the D7 pattern to play an F#7 chord),
it's not always the easiest way. That's where the root note of the
chord pattern comes in handy. It gives you another way to place the
chord patterns on the fretboard. Here's what I mean:

|
Figure 23.
The D7 pattern, placed
somewhere on the
fretboard
|
Remember those white dots in the chord patterns? Those mark the
root of the chord. If we're playing a D7 chord, the third string
will have to be a "D". This means that the pattern will need to be
placed so that the third string, second fret is played.

|
Figure 24.
The D7 pattern, playing
a
D7 chord
|
That was a trivial example you already know how to use the D7 pattern
to play a D7 chord. This technique becomes useful when the chord
placement is not so obvious. The example we were working on was to
play an F#7 chord using this pattern. Here goes: on the third
string, an F# is on the 6th fret. So to play an F#7 chord, just place
the pattern so that the third string is fretted on the sixth fret.

|
Figure 25.
The D7 pattern, playing
an
F#7 chord
|
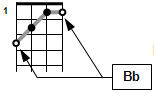
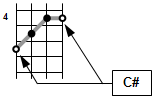
Here's another example, using the Bb major chord pattern to play a
C# major chord:

|
Figure 26.
The Bb major pattern,
placed
somewhere on the
fretboard
|
This pattern has the root note on both the first and fourth strings.
When you use this pattern to play a Bb major chord, a "Bb" is on the first
string first fret, and also on the fourth string third fret.
|
Figure 27.
The Bb major pattern,
playing a Bb major
chord
|
The note "C#" is on the first string fourth fret, so here's how to
play a C# major chord. Of course, the fourth string sixth fret is
also a C#.
|
Figure 28.
The Bb major pattern,
playing a C# major
chord
|
| METHOD #2: As you memorize the chord patterns, remember which
string is the root note of the chord. Use that string to place the
pattern on the correct fret. |
To remember which string is the root note in any pattern, it can help
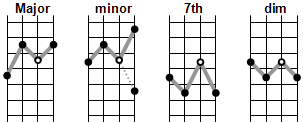
to categorize the patterns by the open pitch of the root note's string:
which patterns are "G string patterns" (that is, the patterns where the
root is on the "G" string, the fourth string), which patterns are "C string
patterns", etc. This will help you to place the pattern on the fretboard
to get the chord that you want. Then, when using a "G string pattern",
place the pattern so that the root note of the chord is on the fourth string.
Same principle for the other patterns.
|
Figure 29.
The G string patterns
(root note on the
fourth string)
|
|
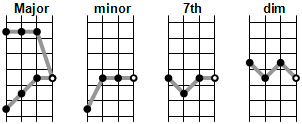
Figure 30.
The C string patterns
(root note on the
third string)
|
|
Figure 31.
The E string patterns
(root note on the
second string)
|
|
Figure 32.
The A string patterns
(root note on the
first string)
|
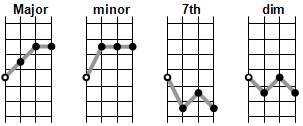
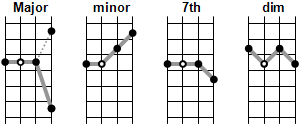
As you can see, you have two different patterns for the C string major
chord. This gives you a couple of options on how to play the major
chord. Same thing with the A string major chord and the E string
minor chord. And you can see that the G string major chord is also
one of the A string major chords. Same thing with the G string minor
chord: same as one of the A string minor chords. Again, this
gives you a couple of options on how to place these chords.
Of course, you'll have to know which notes correspond to which frets
for each string. But you already know that, don't you? If not,
a little work on scales would help. Proficiency on your scales will
enhance so many areas in your ukulele playing; it's not just for "Chord
Magic". There's another web page here called "All
The Notes On All The Strings" to help you learn where the notes are
on the fretboard
| TIP: Here's a good way to learn how all the chords fit onto the fretboard.
Find a song that you like, one that doesn't have any chords except
major chords, 7th chords, minor chords, and diminished chords. The
key doesn't matter. Then play that song using only G string chords.
Then do the same thing with another song: play it with only the G
string chords. When you're feeling good about the G string chords,
then play these same songs using only C string chords. Then move
on to E string chords, then to A string chords. You'll start to get
a really good feel for where the notes are on the fretboard, and you'll
see that placing chords up and down the neck starts to become second nature. |
A word about diminished chords. Recall that there's only one
pattern for diminished chords (actually, it's really four patterns, but
they're identical). If you look at the sequence of patterns in Figure
21, you'll see that the root of the chord can be on any of the four strings,
depending on which of the four (identical) patterns you're using.
So, to play a Cdim chord, for example, place the zig-zag diminshed pattern
onto the fretboard such that any string is playing a "C", and you'll have
a Cdim chord! Since the three other strings are playing three other
notes (in this example, Eb, F#, and A), you're also playing three other
chords: Ebdim, F#dim, and Adim. Make sure you've got this concept;
this is one of those really handy tips. Everybody has trouble remembering
all of the diminished chords, but now you won't.
| TIP: To play any diminished chord, place the diminished pattern such
that any string is playing the root note. (This is just a special
case of Method #2, above, but since everybody struggles with diminished
chords, I wanted to make it blatantly obvious.) |
A third way to place the chords on the fretboard is by using what you've
just learned in the first part of this lesson. It's kind of obvious,
but let's talk about it here just to make sure you've got it. After
you've acquired the "feel" of how to move through the chord pattern sequence,
start with the first position of the chord (you already know those, they're
the basic chord fingerings that you see on all the chord charts), and then
move up to the next chord in the pattern. Again, it's kind of obvious,
and it's not always the easiest way to find a higher position chord, but
you do need to learn how to do this. As you use these chord pattern
sequences, they'll become more natural and intuitive. Even though
it's "magic", you still have to practice it!
| METHOD #3: To play chords farther up the neck, start off with
the chord in first position, then jump to the next position of that same
chord using the sequence of patterns that you've learned. |
There's no substitute for practicing "under fire". Don't
just do drills, moving up and down the fretboard use some alternate chord
positions when you're playing real songs, especially when you're playing
with other musicians. It'll really reinforce what you've learned,
and finding these chords will quickly become second nature.
|